This page will show you how to edit videos using the edit function of the software.
*The functions on this page can be used with ZEUS EDIT and ZEUS EDIT LITE.
Edit Function Screen
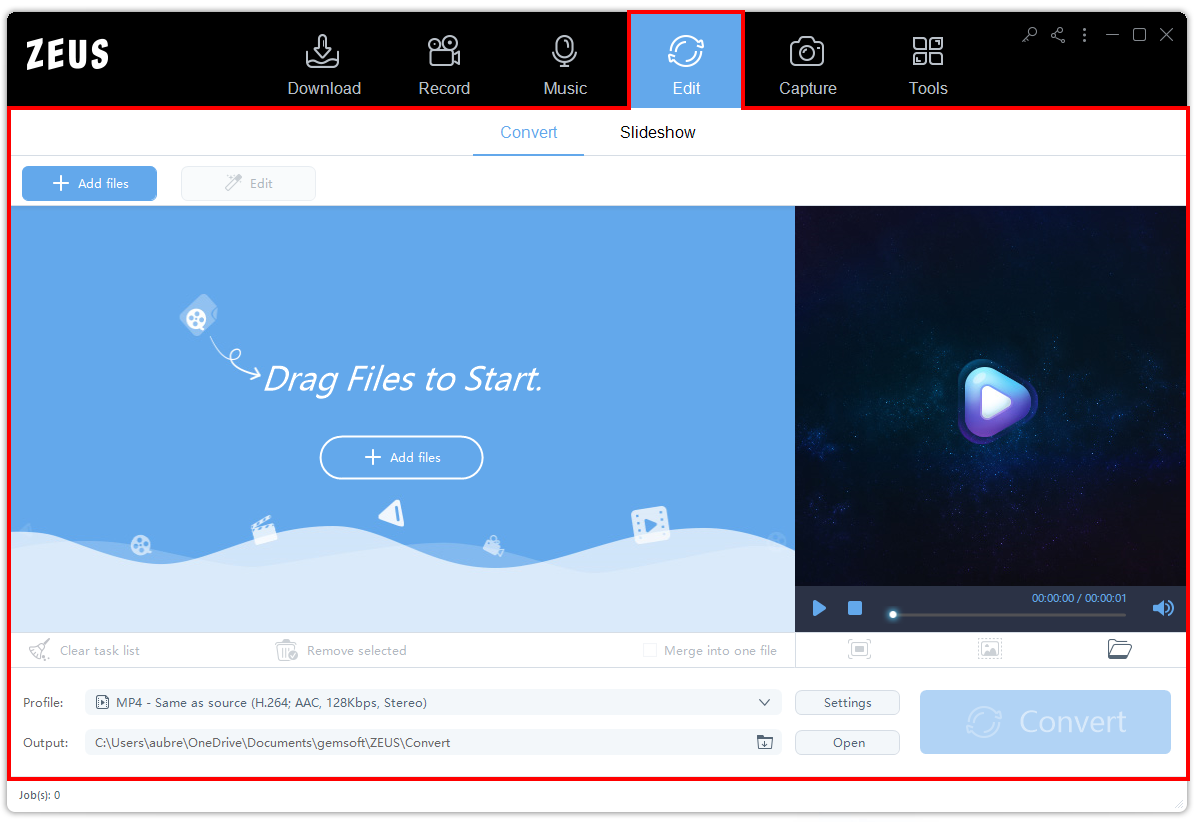
This function allows you to edit your downloaded or recorded files. You can also import your local files through drag and drop. Click the “Edit” menu at the top to open the Edit function screen. You can then see all the features available under the Edit function.
Convert Sub-function tab
Under the “Edit” function screen, click the “Convert” sub-function tab to add files and edit.
![]()
This page shows editing features. Check here for other Sub-Function tabs.
How To Edit Your Video
1. Select Video to Edit
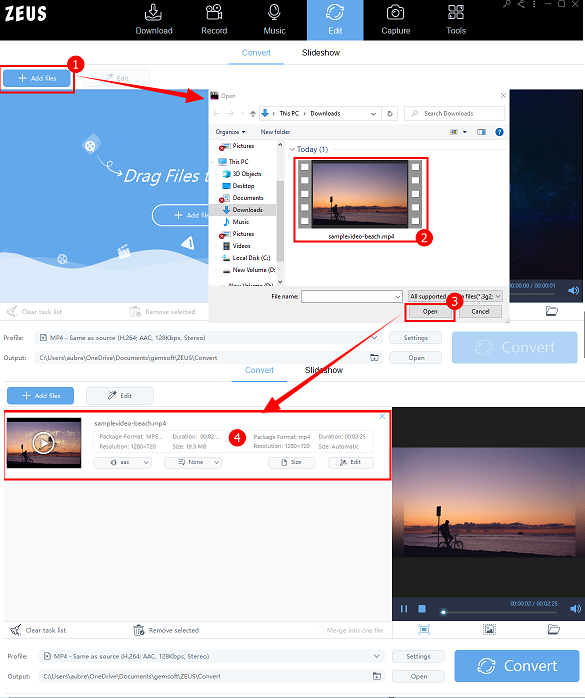
Click the 1. “+ Add File” button to open the file selection screen to add. 2. Select a video file and 3. Click the “Open” button of the software. The operation of this screen is the same as that of Windows Explorer. You can select multiple files by dragging the mouse or holding down the Ctrl key on your keyboard and clicking on a file. You cannot select multiple files when using the ZEUS EDIT LITE. The 4. selected file will be added to the main screen as shown below.
2: Edit the Added Files
Click the 5. “Edit” icon to open the edit screen.
Note: Details will be explained in the next section.

The editing tools available are the following:
A. Preview the Added File.
Once you click the video, you will be redirected to another window to let you preview your video before editing.
B. Maximize button
Preview your video file to another window.
C. Screenshot
Take a screenshot of the playing screen and save the image file.
D. Save folder
You can see all your screenshots in this folder.
E. Audio selection/addition
You can change the BGM by adding audio and music files. Choosing “None” is also possible.
F. Subtitle Selection/Addition
Subtitles can be edited. The files that can be used are the same on the subtitle tab of the edit screen. See the section at the bottom of this page.
G. File size settings
Specify the desired file size after conversion. If you set a smaller size, the file size will be smaller and will also affect the quality of the image. to avoid this, select the “Automatic” format.
3: Video Editing
Click the “Edit” button to begin editing your video. A dedicated editing screen opens to start editing.
Here are the function tabs of the Edit screen:
3.6. Trim Tab
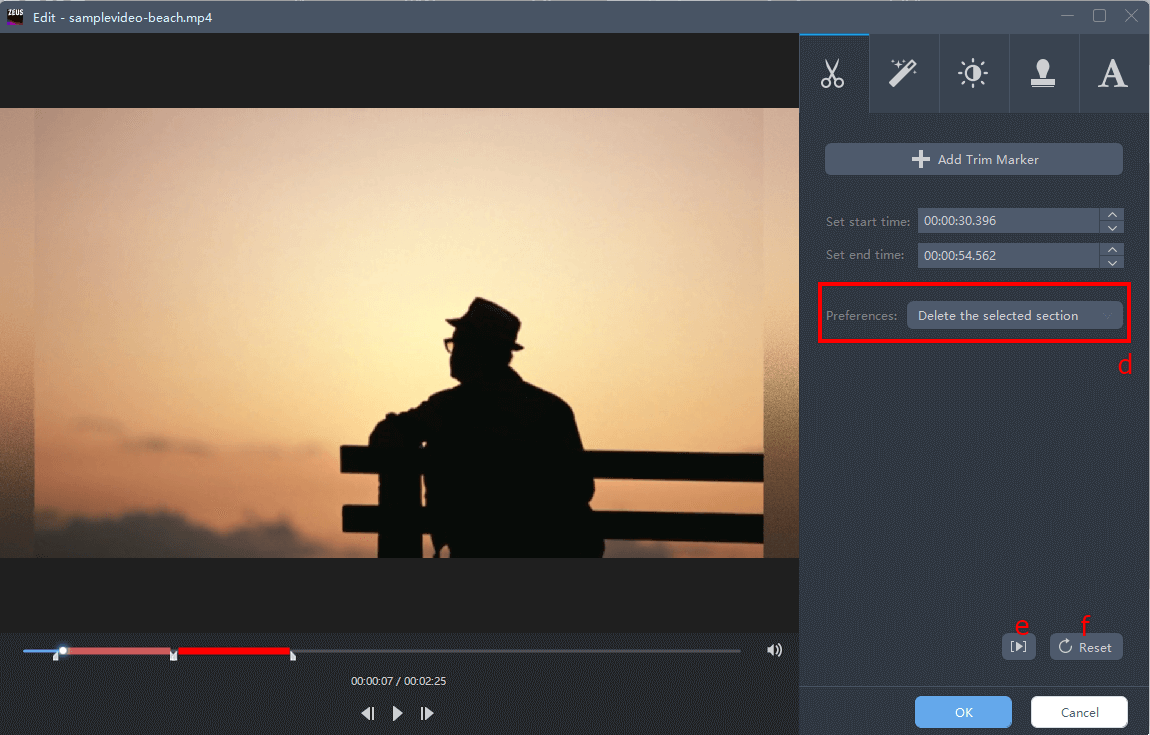
To cut off specific areas of a video, use this editing tool. You have the option of keeping or deleting the selected portion. You can also add multiple marks to trim.
3.6.1 Select the range to keep
Click a. “Add Trim Marker” icon. The trimming area is displayed as a green band (the range to the left) The b. Serves as a starting point while c. indicates the endpoint of trimming.

3.6.2
Click again to add a new crop area. The trimming area will be added to the currently playing area.

3.6.3 Adjust the range based on what needs to be removed
If you want to delete the selected part, just click the D. “Preferences” button then select the “Delete the Selected Section”. After deleting, the trimming area will change back to a red-colored band. E. Play the part covered by the trimming area. Click the F. Erase to clear settings.
3.7. Adjust Tab
Rotate/Reverse video/Crop/Aspect ratio (aspect ratio)/Adjust video and audio timing.
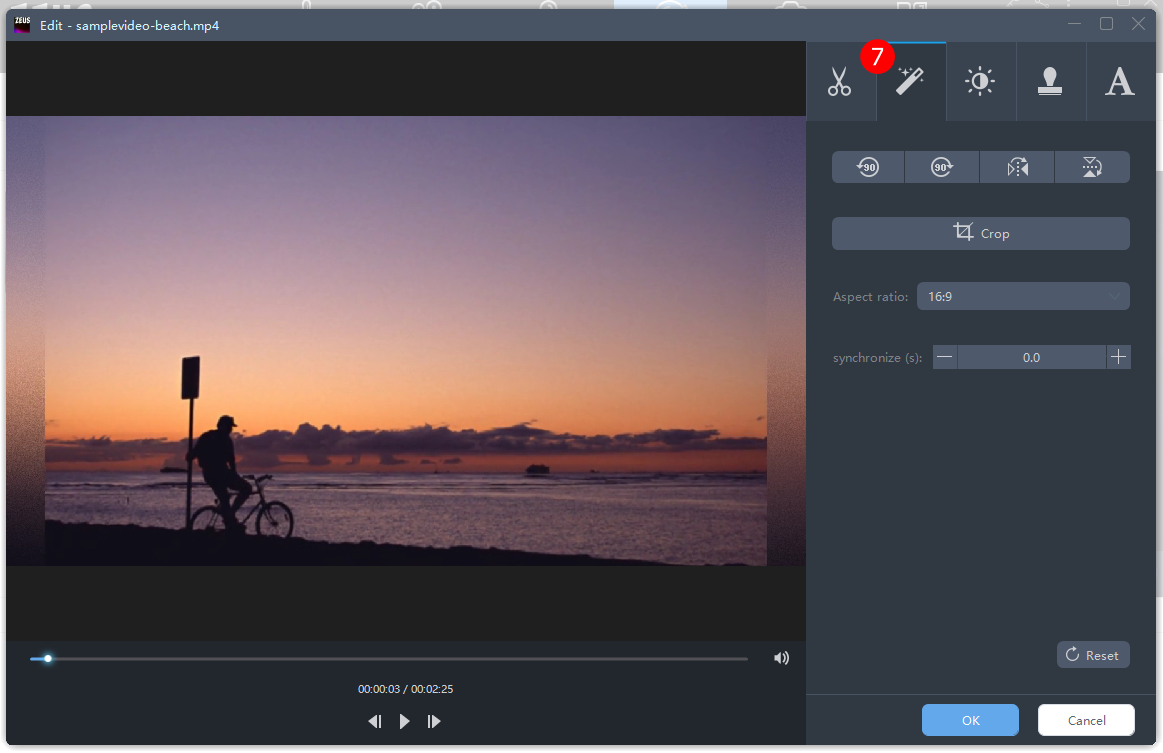
The functions under the “Adjust” tab are as follow:
3.7.1 Rotate/Reverse
From the left, rotate 90 degrees clockwise / 90 degrees clockwise / flip left / right / flip up / down
3.7.2 Crop
Zoom in the selected range. The location is the position from the upper left (pixels), and the size is vertical x horizontal (pixels)
3.7.3 Aspect Ratio
Set the aspect ratio. Original / 16: 9/4: 3 / 2.35: 1
3.7.4 Synchronize(s)
Set the audio. If the audio is delayed, adjust accordingly using the (-) sign and if the audio is fast, set using the (+) to adjust timing.
3.8. Effects Tab
Adjust the speed/volume/image quality of the video.

3.8.1 Speed
Adjust the playback speed of the video. From 0.5 – 2.0, the bigger the number, the faster the playback speed. The original value is set at 1.0.
3.8.2 Volume
Adjust the volume of the video. 0 – 200, the bigger the number the louder the sound will be. The original value is set at 100.
3.8.3 Contrast/Brightness/Saturation
Contrast is the intensity of black and white. The bigger the number, the clearer the image. Luminance is brightness. The bigger the number, the brighter the image will be. Saturation for color adjustment. The higher the number, the more strong the colors will be and vice versa. In both cases, the range of numbers is -100 to 100. The original is set at 0.
3.9. Watermark Tab
Insert a watermark in text or image. You can place more than one video and will be displayed from the beginning to the end of the video. This function can also be used for making video titles.
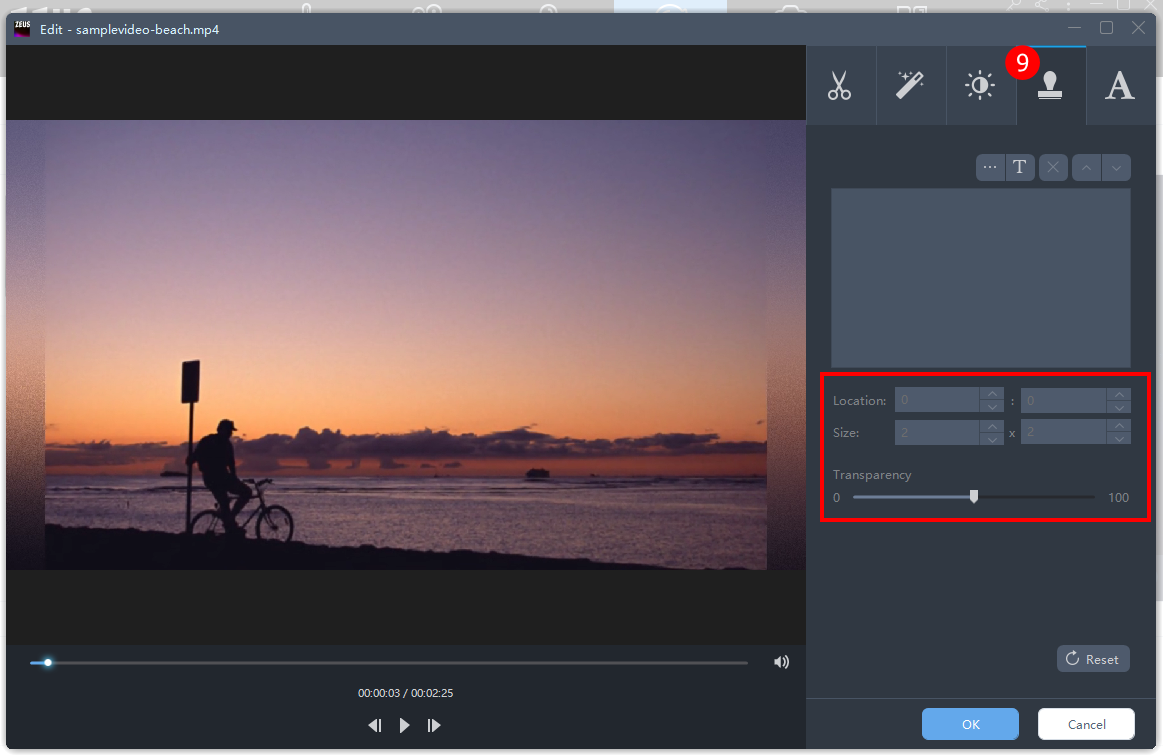
From the left, add image file / add text / delete selected watermark / move selected watermark above / below overlap
3.9.1. List of added watermarks can be re-edited from the button on the far right
3.9.2. Location, size, and transparency of the selected watermark (the larger the number, the more transparent)
Note: The position and size of the placed watermark can be changed even on the preview.
3.10. Subtitle Tab
It allows you to easily add subtitles to your video. You can also add customizations and styles to achieve your preferred effect.
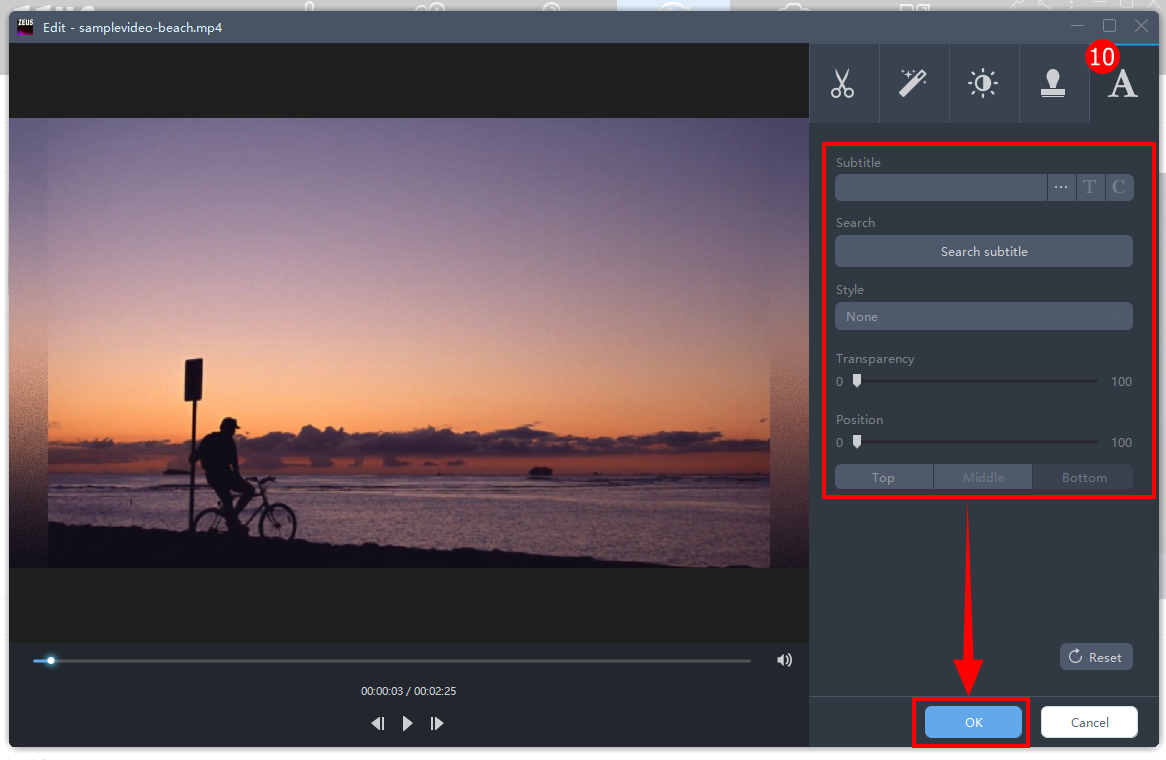
Note: You may use the original subtitles
The functions under the “Subtitle” tab are as follow:
3.10.1. Subtitle
From the left, the location of the subtitle file/selection of the subtitle file/setting of the typeface (font) / setting of the subtitle set (country/region)
3.10.2. Search Subtitle
Click the “Search subtitle” button to browse all related subtitles available on the internet.
3.10.3. Style
Customize the subtitle by adding styles.
3.10.4. Transparency and Position
Set transparency and location of the subtitles.
Leave A Comment