How to Record Gameplay on PC Windows 11
Nowadays, most teenagers and even adults prefer to play online games. This is something they do as a pastime or release stress. Some even do gameplay live streaming to express themselves while gaining profit from it. They record their gaming to make it more memorable and purposeful, especially if they had amazing skills or maneuvers during their play. The most common way for gamers to do live streaming is by uploading pre-recorded gameplays. Through this, they can edit videos, delete unnecessary parts, and make them more impactful to audiences.
Recording Gameplay on PC Windows 11
Windows 11 gets the interest of gamers. According to PC Mag’s – Windows 11 vs. Windows 10, Play-Tested: Will an OS Upgrade Boost Your Gaming Performance? article, there is a significant increase in graphics performance when using Windows 11. This would be perfect when doing pre-recorded gameplays for the gamer’s avid fans. Windows 11 is the most recent version of Windows, and most of us have upgraded to it because it offers so many useful features. Unfortunately, not all screen recorders are supported by Windows 11.
To help you, this article aims to teach you how to record gameplay on PC Windows 11. We have listed the 2 best screen recorders that work well with Windows 11 with amazing features that will suit you well. Since not everyone’s PC is compatible with the OS version of Windows 11, having a tool that allows you to record your games is useful. Through these screen recorders, you can even record gameplays from the most popular online games such as Valorant, Dota, Minecraft, and Special Force. Even if your Windows has already been upgraded, you may easily utilize this software to record your gameplay because it works with the most latest edition. So there’s no reason for you to be concerned about this.
Record Gameplay on PC Windows 11 with ZEUS RECORD
To record your gameplay, one of the best software for this is ZEUS RECORD. It provides a multitude of advanced features that you will surely enjoy. It supports a variety of output formats, including MP4, WMV, AVI, and many others. If you use this software to record your gaming, it won’t be a hassle since it is built with a user-friendly interface which makes it super easy to navigate. Annotate recording is also possible in this software to modify your recordings and highlight the specific parts of the game.
Steps to Record with ZEUS RECORD
Step 1: Set System Sound
If you want to record your gameplay with audio, Open ZEUS then click the “Record” button. The sound source is set as “System Sound” by default, click it to select other options available.
For gameplay recording, it is recommended to set the sound source to “System sound and microphone” to capture both internal sounds and your microphone sounds.

Step 2: Choose Recording Mode
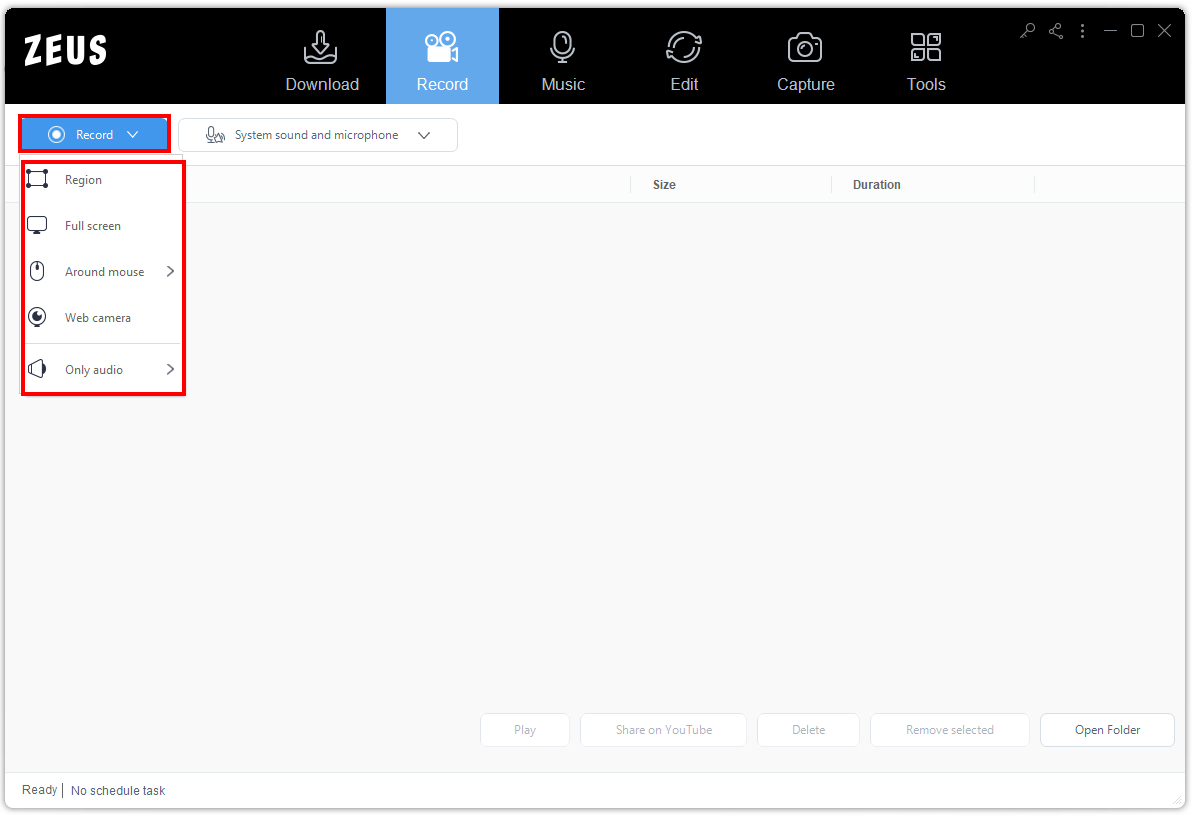
To select the recording mode, click the “Record” button. 5 available options will display on your screen such as Region, Fullscreen, Around Mouse, Web Camera, and Only Audio.
Step 3: Begin to Record your Gameplay
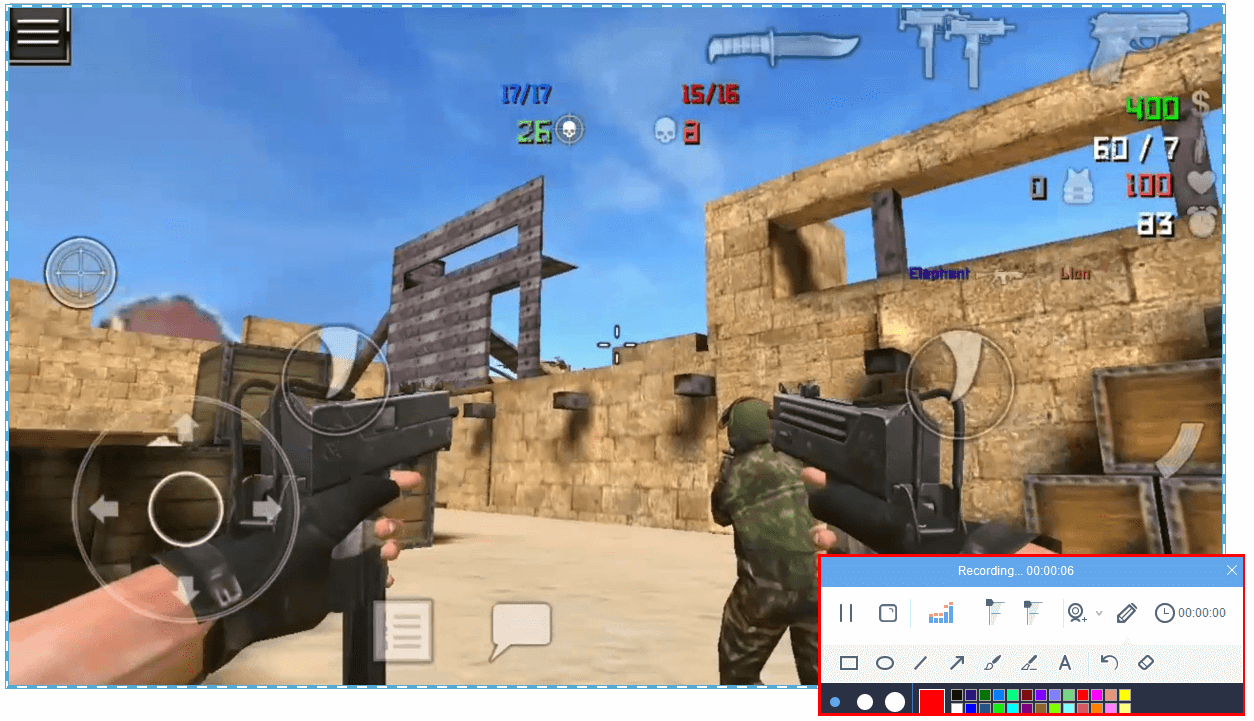
After choosing your desired recording mode, a small box will display on your screen. Just click the “OK” button to continue. Then a three-second countdown will follow. Click the “Pencil” icon on the toolbar to annotate your recording. You may also pause it if necessary. Click the “Stop” button to end the recording once done.
Step 4: Replay the Recorded Gameplay
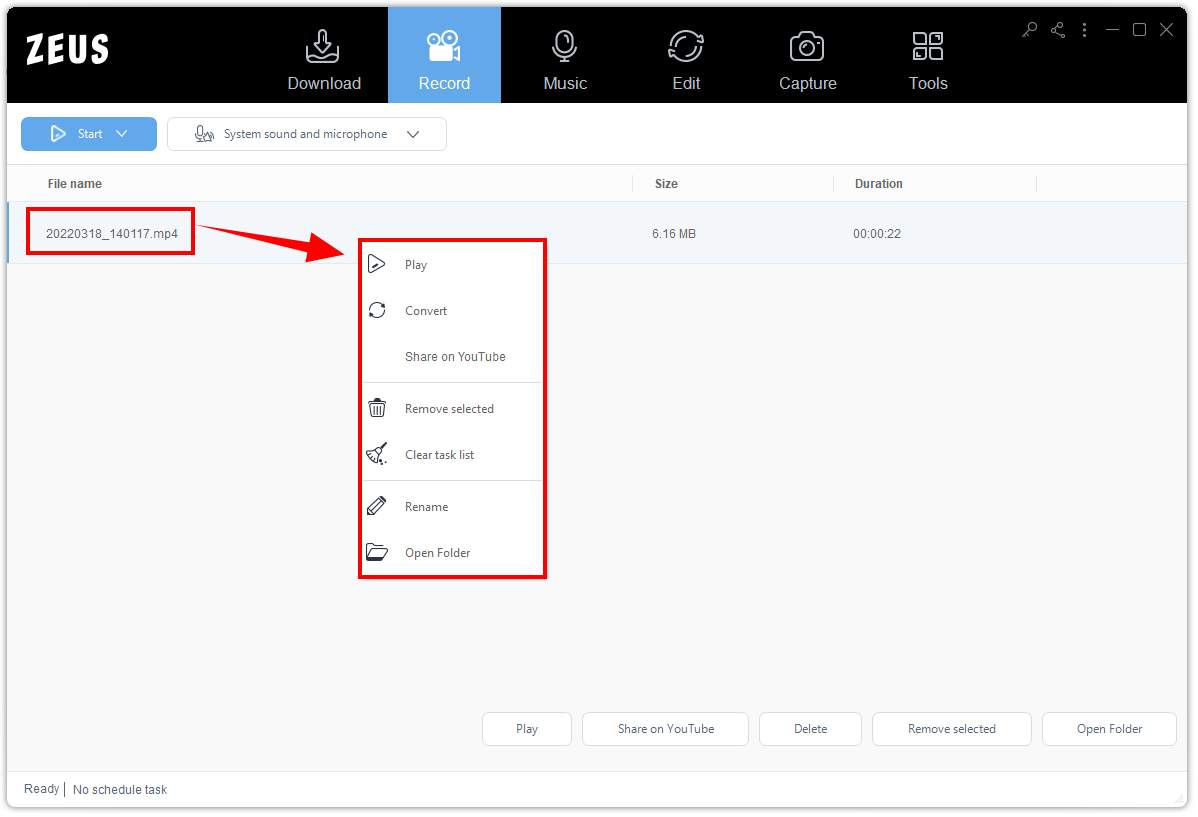
Watch your recorded video by simply double-clicking the file. The recorded gameplay will be saved instantly to your recorded list. If you want to see more options, just right-click the recorded file.
Record Gameplay on PC Windows 11 with VideoPower GREEN
Another gameplay recorder is the VideoPower GREEN application. This software will astound you because it is a user-friendly tool that even non-technical users can use with ease. You may add comments on your recordings through its real-time annotation function, in addition to the high-quality recording feature. If you’re a streamer or new to streaming, especially on YouTube, this application is ideal for you because it allows you to upload directly to YouTube!
Steps to Record using VideoPower GREEN
Step 1: Select a Recording Format
Open the software for you to select a recording format. Click the “Record” button then all available lists of recording formats will display.
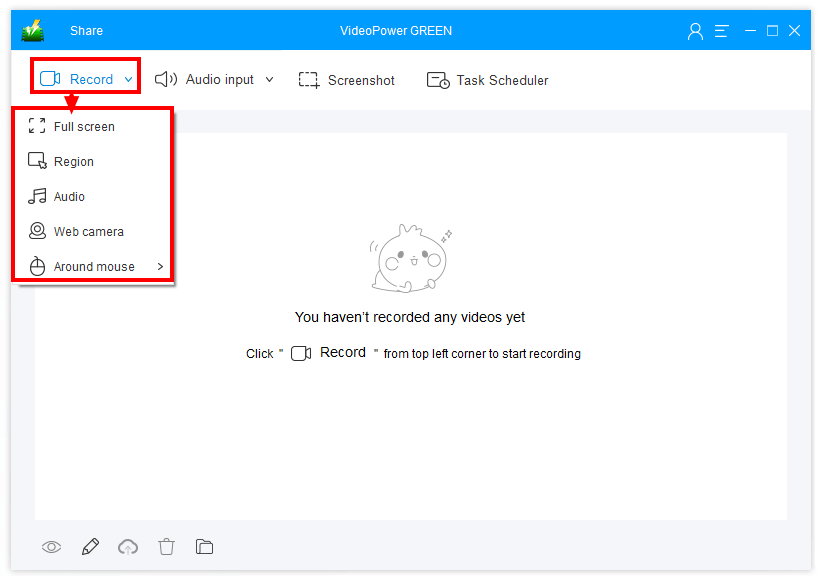
Fullscreen or Region format is much more recommended in recording your gameplay.
Step 2: Start Recording
To select the recording mode you want, just click the “Record” button of the software. A list of selections will then display for you to choose from such as Region, Fullscreen, Audio- only, etc.
After selecting the recording format, click the “OK” button of the window that will appear on your screen. There will be a three-second countdown to commence. Once the countdown is over, the recording will then begin. Use the software’s control taskbar and click the “Edit” button to add texts, shapes, lines, arrows, and many more to your recordings.
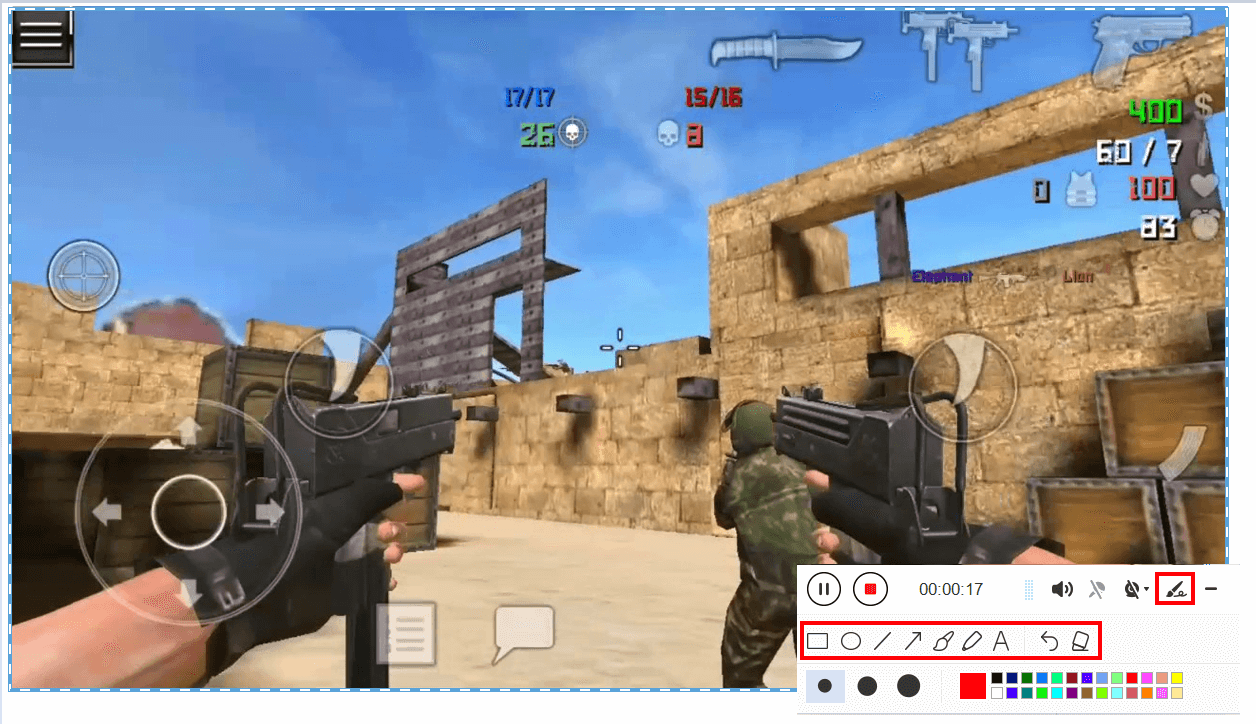
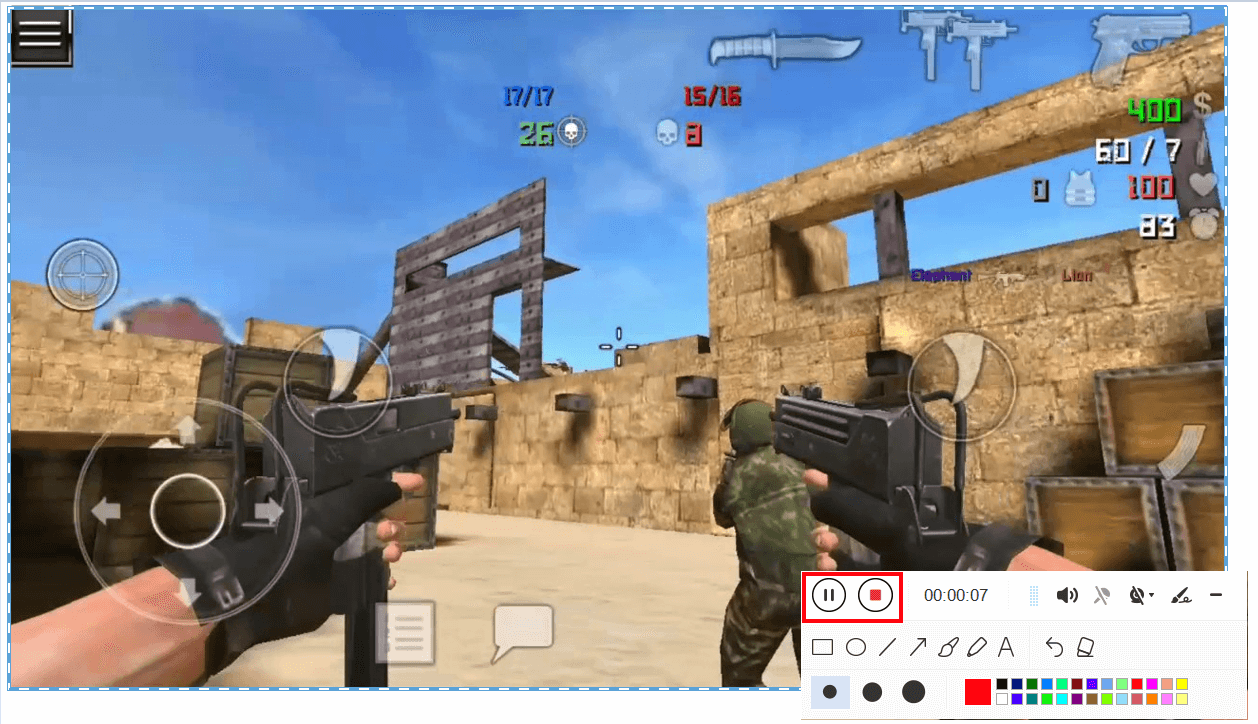
Then to stop the recording, simply click the “Stop” button of the software. You may also click the “Pause” button if you wish to pause recordings.
Step 3: Watch your Gameplay
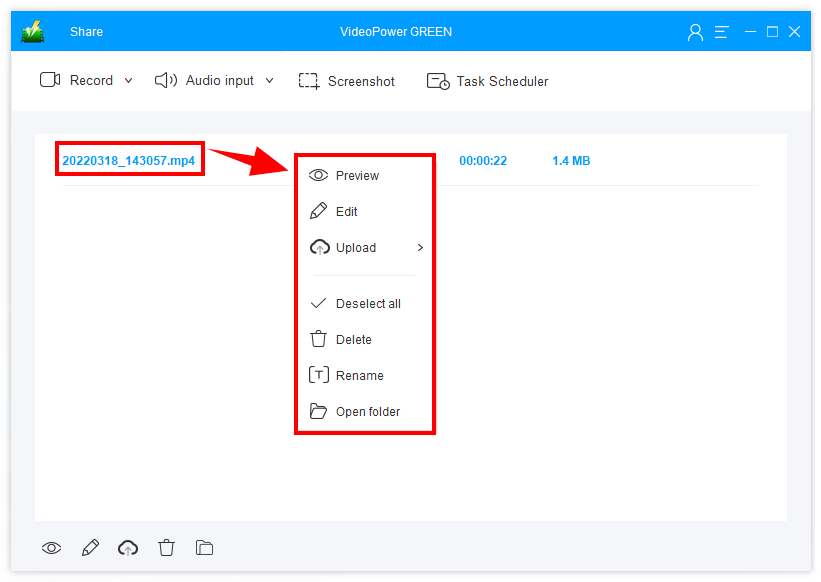
Once you click the “Stop” button, it will be automatically stored in your recorded list. Just double-click the file to watch it. You may also right-click to see more available options.
Conclusion
There are a lot of ways to save your gameplay but most of them do not meet our expectations in screen recording. Good thing there’s ZEUS RECORD and VideoPower GREEN that will help us on how to record gameplay on PC Windows 11! This software will help you save your one-of-a-kind gameplay with ease. The above-mentioned software is great just in case you have the upgraded version of Windows 11. You will also be comfortable with this software as it is compatible with the latest version of Windows 11.